Estimated reading time: 18 minutes
In this article, I’m going to show you how to edit photos in Snapseed.
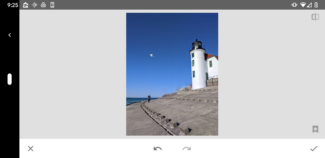
I’ll show you how to get up and running. I’ll show you how to add basic edits to your images. And I’ll show you how to apply powerful local adjustments via Snapseed’s advanced tools.
So if you’re ready to become a Snapseed editing pro…
…then let’s get started.
What Is Snapseed?
Snapseed is a powerful mobile editor.
At present, it only exists as an Android or an iOS app–which means that you can only use Snapseed to edit images on your phone.
Does that mean you can only use Snapseed to edit photos taken with a smartphone?
Absolutely not!
You can always use Snapseed to edit images taken with a DSLR, a mirrorless camera, or a point-and-shoot camera. You simply have to upload them to your smartphone–and then bring them into Snapseed!
By the way, don’t think that, because Snapseed is a mobile editor, it has limited capabilities.
In fact, Snapseed offers advanced capabilities that rival (and sometimes even surpass) editors such as Lightroom or Luminar.
So just keep that in mind as you’re editing your photos in Snapseed.
Importing Photos Into Snapseed
Editing in Snapseed always starts by importing a photo.
When you open Snapseed, you’ll find a blank page that instructs you to Tap Anywhere to Open a Photo:

So tap in the center of the screen (or tap the Open button in the upper right-hand corner). Your photo collection will open (though you may need to give Snapseed permission to access your images, first).
Pick the photo you’d like to edit, and tap to open it in the Snapseed editor.
Note that Snapseed does not offer any image organization capabilities.
Also Read: Best Image Organizers for Windows
You can only open a single photo at a time–and, when you’re done editing, you’ll need to save that photo outside of the Snapseed interface (as I discuss later on in this article).
Make sense?
So you import a photo, you edit it, and you export it. One at a time.
How to Edit in Snapseed: The Editing Interface
Once you’ve opened an image in Snapseed, you’ll be faced with a relatively simple window, like this:
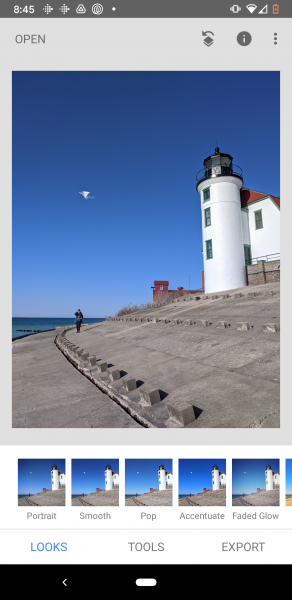
In the center is the image you’re editing.
Across the top are a few options, including:
- Open, which allows you to open a new image, though bear in mind that this will replace the image you’re currently editing
- The Undo/Redo option, which allows you to undo or redo edits, see a list of your edits, or revert back to the original image
- The Info option, which gives you key image data, such as settings and any GPS data for the image location
- And the More dropdown, which allows you to change your Snapseed preferences, view Snapseed tutorials, and more
At the bottom of the screen, however, is your editing bread and butter.
By default, the Snapseed Looks panel will be activated, which displays a set of possible Looks (i.e., presets) you can apply to your image with a single tap. Note that Snapseed offers a number of in-built Looks, but you can also create Looks of your own as you edit.
You can also access the Snapseed Tools panel, which gives you access to Snapseed’s most powerful functions, including:
Details, Curves, White Balance, Brush, Tune Image, and a handful of useful filters that’ll let you give your images custom grunge, noir, or grainy looks, among others.
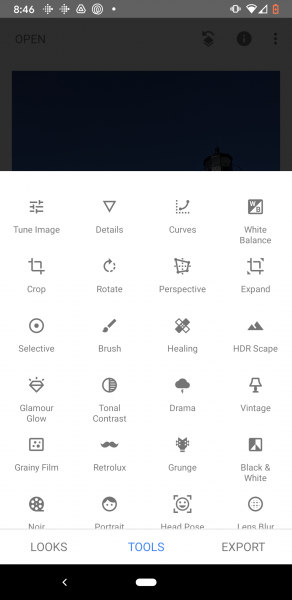
Finally, on the bottom right, you’ll see the Export panel, which is what you’ll use when you’ve finished your Snapseed edit.
Now let’s take a look at basic editing in Snapseed, so you can get started improving your images:
How to Edit Photos in Snapseed: Basic Edits
I’d suggest you always begin editing in Snapseed by considering a few simple edits:
1. Scroll Through the Looks Panel and Test Out Different Options
Before you apply a single Tool in Snapseed, I recommend experimenting with the different Look options.
Simply scroll through and tap different Looks. Do any appeal to you? Do any make your photo look better?
If the answer is yes, then by all means, keep the Look!
Sometimes editing really is that simple, and you don’t need to do anything more; if that’s the case, you can skip to the Export panel.
However, if you’re a fan of a Look but still want to make further changes, you should tap on the Tools panel.
And if you don’t like any of the Looks, that’s okay, too.
Simply move on to the Tools panel, where you can get into the specific, fine-grained editing.
2. Start With Tune Image in the Tools Panel
To access Tune Image, simply open the Tools panel, and tap on Tune Image in the top left.
Note that, when using Snapseed Tools, you’ll see the active adjustment displayed at the top of the screen:
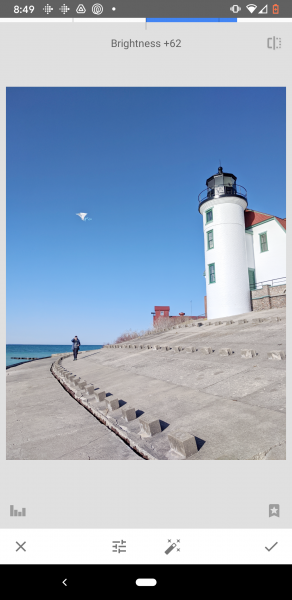
And as you make changes, you’ll see those changes displayed just above the adjustment label.
Also, to switch adjustments, simply swipe up or down on your photo. This will bring up all the adjustments offered by your selected Tool:
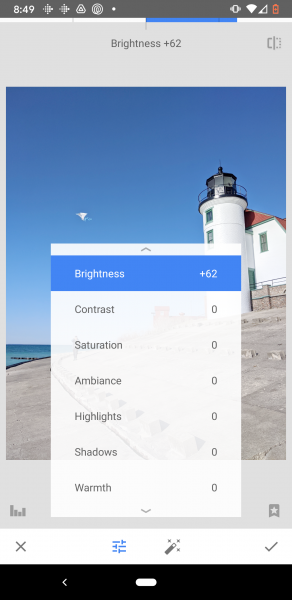
You can also bring up the available adjustments by tapping the Adjustment icon at the bottom of the screen.
Anyway, I recommend you start by adjusting the Brightness of your image. Ask yourself: Does it seem too dark? Too bright? Just right? It’s good to have an image that has its tones mainly concentrated in the middle, without too many darks or lights (though there are plenty of exceptions, of course!).
So select the Brightness adjustment, then swipe right to boost the Brightness, or left to reduce the Brightness.
Next, try giving your image a Contrast boost; this will make your image pop, which is almost always a good thing.
Select the Contrast adjustment, then swipe right:
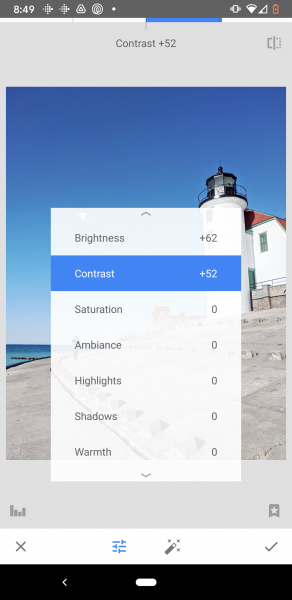
Consider boosting the Saturation of your image, especially if you want your colors to stand out.
Select the Saturation adjustment, then swipe right.
Finally, tap the Checkmark in the bottom right-hand corner to save your adjustments.
And that’s it! You’re done with the first set of Snapseed edits. Of course, you’re free to experiment with the other options in the Tune Image tool, such as Highlights and Shadows (which will allow you to further fine-tune your image’s brightness).
But feel free to move onto the next Snapseed editing step:
3. Use the Crop Tool to Improve Your Composition
It’s a good idea to compose your images perfectly when out shooting.
But this isn’t always possible.
You’ll sometimes be faced with situations where you just can’t get the composition right in-camera, or you notice a better composition when you review the image later on.
So what do you do?
You crop, of course!
Simply open the Crop tool in Snapseed, then decide on your desired aspect ratio:
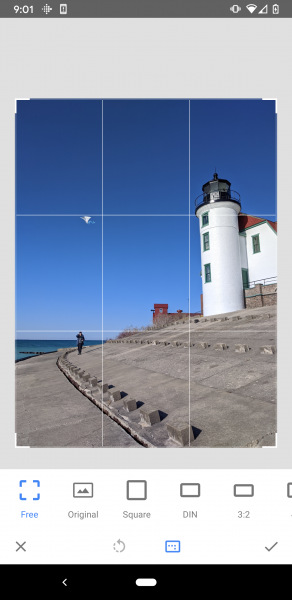
(I often use the default, which is Free, but you can use a Square crop, a 3:2 crop, or something else entirely!)
Next, drag at the corners of your image to determine where you’d like to crop.
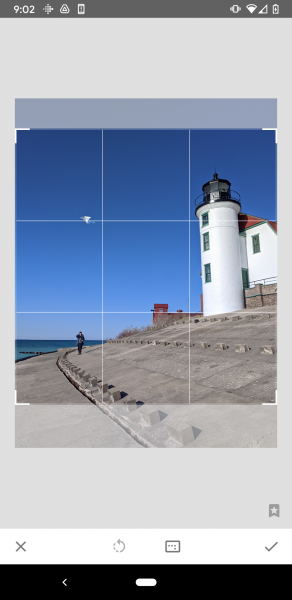
As you do this, I’d recommend thinking about your composition. Are there areas that distract from the viewer? If so, eliminate them. Do you need to reposition your subject so it sits along a rule of thirds gridline? If so, make it happen!
Then tap the Checkmark to save your crop.
You do need to be cautious when cropping, however. If you crop too much, you’ll eliminate pixels–and if you eliminate too many pixels, you’ll end up with a low-quality image.
So crop as much as necessary, and no more.
4. Straighten Your Image With the Rotate Tool
This is a fast adjustment, but one I always recommend you try:
Straighten your image.
Plenty of your images will have crooked horizons, even if you don’t notice at first glance.
So access the Rotate tool.
Then simply drag your finger around the outside of the photo to straighten it:
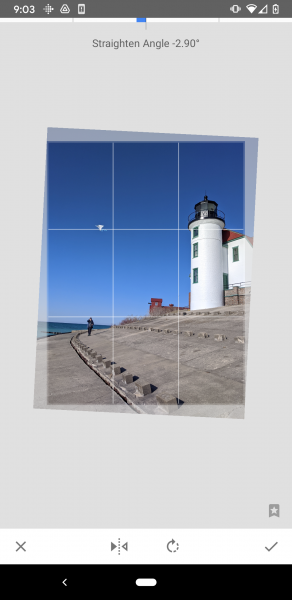
And hit the Checkmark to save your edit.
5. Correct the Colors in Your Image With the White Balance Tool
Pretty much all lighting has a color cast of some sort.
Now, your camera will automatically take care of this most of the time.
But there will be occasions when your camera doesn’t accurately remove (i.e., balance out) the color cast.
And that’s where the Snapseed White Balance tool comes in.
It’ll make sure you get rid of any unwanted color casts–which will keep the colors in your images looking as accurate as possible.
Here’s how it works:
First, tap the White Balance tool in Snapseed, then tap the Eyedropper icon at the bottom of the screen:
Drag the Eyedropper over an area of your photo that’s supposed to have a neutral white or a neutral gray color:
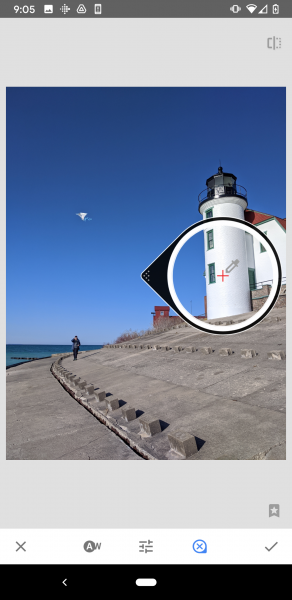
And Snapseed will automatically balance out any color casts for you!
By the way, if you’re not happy with the results, that’s okay (and it’s bound to happen occasionally!).
Just tap the adjustment icon at the bottom of the screen to access the manual White Balance adjustments:
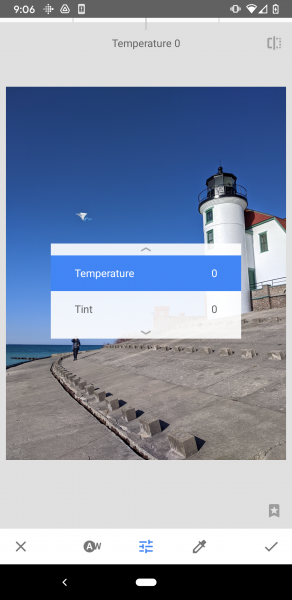
Then adjust the Temperature and the Tint until you get the look you’re after.
(I’d recommend focusing on the Temperature, because most light sources don’t have much of a Tint color cast that needs to be dealt with.)
Then hit the Checkmark to save your edit.
6. Add a Bit of Crispness With the Details Tool
Take a look at your image.
Ask yourself:
Does it look sharp? Or could it use a bit of additional crispness?
(It’s important that you evaluate this thoroughly, because adding crispness when your image is already crisp can result in unwanted artifacts.)
If you decide to make your image sharper, simply select the Details tool in Snapseed. Then swipe up to access the Structure and Sharpening adjustments:
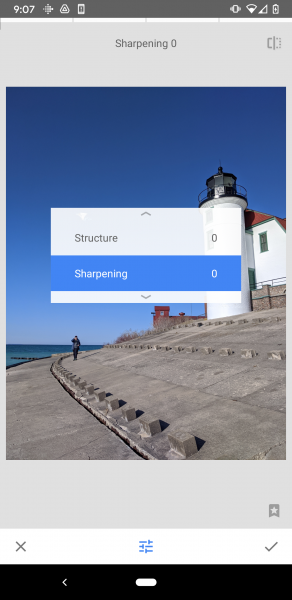
I’d recommend carefully applying a bit of Structure, and then a bit of Sharpening, to your image. Generally, Structure works well when your image has a lot of texture you want to bring out. Whereas sharpening enhances fine details (such as the hair on a person’s head).
But be careful not to add too much Structure or too much Sharpening; these adjustments only work in moderation.
How to Edit Photos in Snapseed: Advanced Edits
If you follow the basic Snapseed editing instructions I’ve given above, you’ll come away with some great results.
But if you want to really take your images to the next level, Snapseed offers some powerful tools that’ll let you apply all sorts of selective edits and cool effects to your images.
That’s what this section is all about.
Use the Selective Tool to Add Specific Adjustments to Your Photo
The Selective tool allows you to apply edits to a portion of your photo, while leaving the rest of the photo untouched.
Specifically, you can add targeted Brightness, Contrast, Structure, and Saturation adjustments to your images.
Why is this such a big deal?
The Selective tool lets you hone in on specific parts of your images that need a special set of edits. For instance, if you want to brighten up your subject’s face, you can use a Selective Brightness adjustment. And if you want to desaturate a distracting color in the background, you can use a Selective Saturation adjustment.
Here’s how it works:
First, tap on the Selective tool, then tap to place a Selection point on your photo:
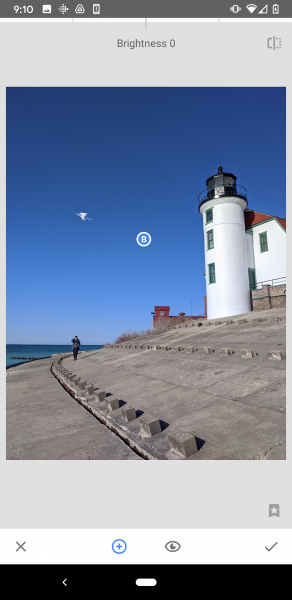
Note that you can add additional Selection points by tapping the Plus icon at the bottom of the image.
And to adjust previous Selection points, just tap on a Selection point indicator on your image.
Now, Selection points apply specific edits where they’re positioned. So if you want to adjust the brightness at the photo’s center, you’d drop a Selection point.
You can also increase or decrease the breadth of the edit by touching the screen with two fingers and dragging them farther apart or closer together:
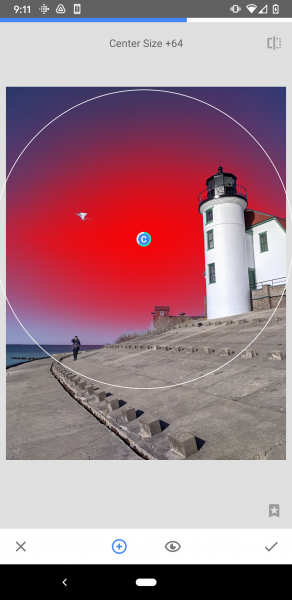
To actually make edits via the Selection point, simply swipe up or down to select the adjustment you’re after.
Then swipe right or left to apply the adjustment!
And tap the Checkmark in the bottom right to save the edit.
It really is that easy.
Use the Vignette Tool to Make Your Main Subject Stand Out
Vignettes are a great way to make the background recede and your subject pop.
And Snapseed offers a fantastic Vignette tool that will allow you to do just that.
Select the Vignette tool in the Tools panel. You’ll then see a circle at the center of your photo:
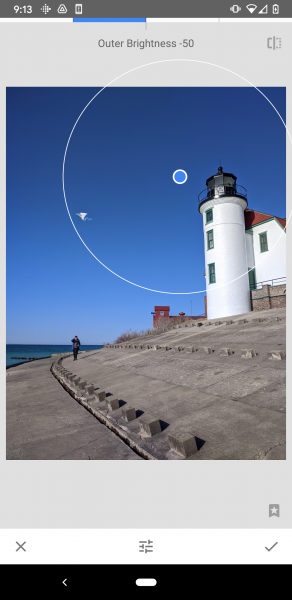
This is the center of the vignette. But if you wish to reposition the vignette, simply drag the circle around the frame:
To make the vignette widen, use two fingers to drag it outward.
And to make the vignette shrink, use two fingers to push it inward.
Then swipe up to select the Outer Brightness or the Inner Brightness adjustment:
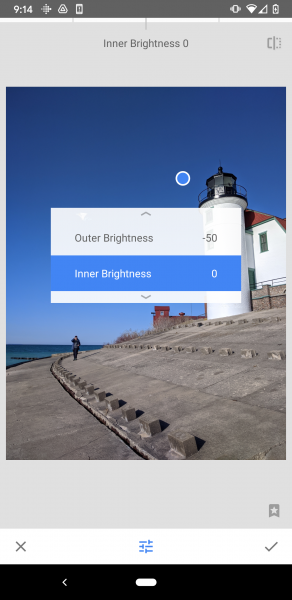
Note that these simply correspond to the inside of the vignette and the outside of the vignette.
So if you want to brighten the inside of the vignette, select the Inner Brightness adjustment, then swipe right.
And if you want to darken the outside of the vignette, select the Outer Brightness adjustment, then swipe left.
Got it?
Generally speaking, it’s a good idea to place the vignette around your subject, then darken the outside edges. You can also consider brightening the inside.
That way, your main subject will stand out while the background fades away.
(As always, make sure you tap the Checkmark to save your vignette.)
Use the Healing Tool to Remove Unwanted Objects
Sometimes, you’ll end up with distracting objects in your images that you just can’t crop away.
For instance, you might have an unpleasant sign behind your main subject. Or you might have a fly on a beautiful flower.
Fortunately, Snapseed offers a Healing tool. This lets you paint over areas you want to make disappear; you can then watch as they vanish!
First, I recommend you identify any objects that you don’t want in your photo.
Then tap the Healing tool in the Tools panel:
Next, zoom in on your image (by dragging with two fingers) until you’re close to the unwanted object.
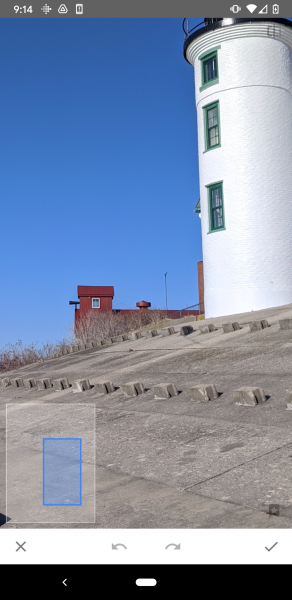
Then paint over the object, and let Snapseed do its thing.
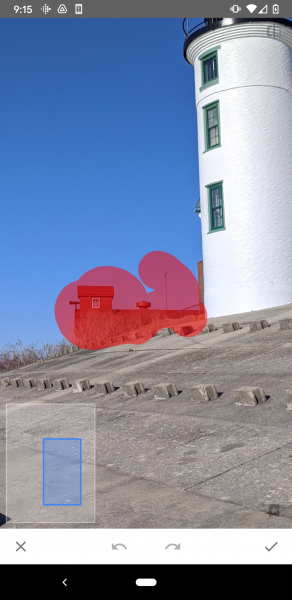
Within seconds, the object will disappear!
And if you don’t like the job Snapseed has done, you can always hit the Undo button at the bottom, then try again:
Very cool.
Will the Healing tool take care of every unwanted part of your photo?
No. It’s not perfect, which means that it’ll occasionally struggle, especially if you force it to remove large areas with complex surroundings.
But it’ll generally do a decent job, and will allow you to clean up small unwanted items from your photos in moments.
How to Edit Photos in Snapseed: The Next Step
Now that you’ve finished this article, you should know how to edit your photos in Snapseed.
Because you know all about importing images. You know about applying basic edits. And you know about a few more advanced options you can try.
So all that’s left to do…
…is to start practicing! I guarantee you’ll get the hang of things, fast.
Is Snapseed a free photo editor?
Yes, Snapseed is a free photo editor. You can grab it off the app store (and it’s available for both iOS and Android phones, so that’s a plus!). There are no in-app purposes, which means that you can get started editing immediately with the full power of Snapseed!
Can you organize your photos in Snapseed?
Unfortunately not. Snapseed doesn’t include organizational capabilities of any type, which means that you must start out every Snapseed session by importing a photo to edit.
Is Snapseed a good photo editor?
Yes, Snapseed is a good photo editor. It offers a lot of power, and includes a mix of useful selective edits, useful global edits, and even some fun filters, such as grunge and noir. Plus, the interface is pretty intuitive! The biggest issue I find with Snapseed is the lack of photo organizational options–you have to import every photo afresh when you want to create a new edit, and this takes an annoying amount of time!
Does Snapseed include filters?
Yes, Snapseed does include filters (though they’re not explicitly labeled as such)! You’ll find them in the Snapseed Tools panel, toward the bottom. Snapseed even lets you adjust the strength of the filter. You’ll find options such as Drama, Grunge, Noir, Vintage, and more. Snapseed also includes a set of built-in presets, called Looks, which you should test out–these are one-click, traditional filters that you can scroll through as soon as you’ve imported an image.
Is there a Snapseed desktop app?
No, Snapseed is a mobile-only editing program. You can use it on your mobile devices, but you cannot use it on your desktop. However, if you like the Snapseed editing style, note that the program was developed by the makers of the DxO PhotoLab desktop editing software–a program that includes some of the same options as Snapseed. So if you’re a fan of Snapseed, or if you think Snapseed looks good but would prefer a desktop option, then I’d highly recommend you check out DxO PhotoLab.
“A full Snapseed guide is so valuable—its tools like selective edits and curves give mobile photos a professional touch. For even higher-level results, I often combine Snapseed with AI apps like Remini to restore details before fine-tuning the edits.”
ReplyDeletePost a Comment